

學習 React Native 14
整合代碼
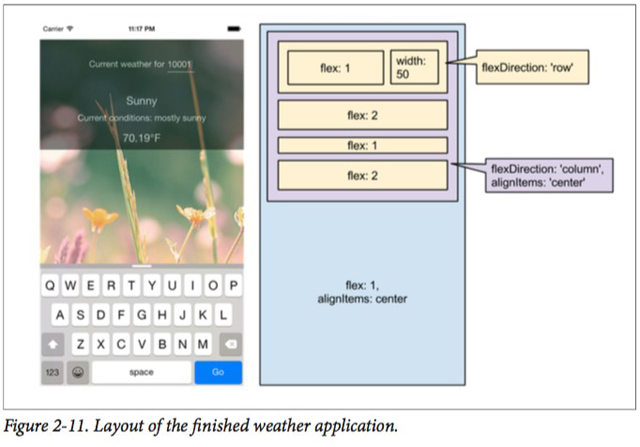
做為該應用程序的最終版本, 你已經認識到做為 <weatherProject> 組件的渲染功能和樣式表的實現了。最主要的變化其實是布局邏輯的變化,如下圖示:
好了!準備好把代碼整合到一起了嗎? 下面是包括了樣式表在內的全部代碼,去試試吧:
'use strict';
var React = require('react-native'); var {
AppRegistry,
StyleSheet,
Text,
View,
TextInput,
Image
} = React;
var Forecast = React.createClass({ render: function() {
return ( <View>
<Text style={styles.bigText}> {this.props.main}
</Text>
<Text style={styles.mainText}>
Current conditions: {this.props.description} </Text>
<Text style={styles.bigText}> {this.props.temp}°F
</Text>
</View>
); }
});
var WeatherProject = React.createClass({ getInitialState: function() {
return { zip: '',
forecast: null };
},
_handleTextChange: function(event) { var zip = event.nativeEvent.text; this.setState({zip: zip}); fetch('http://api.openweathermap.org/data/2.5/weather?q='
+ zip + '&units=imperial')
.then((response) => response.json())
.then((responseJSON) => {
this.setState({ forecast: {
main: responseJSON.weather[0].main,
description: responseJSON.weather[0].description,
temp: responseJSON.main.temp
} });
})?.catch((error) => {
console.warn(error);
});
render: function() { var content = null; if (this.state.forecast !== null) {
content = <Forecast main={this.state.forecast.main}
description={this.state.forecast.description} temp={this.state.forecast.temp}/>;
} return (
<View style={styles.container}>
<Image source={require('image!flowers')}
resizeMode='cover'
style={styles.backdrop}>
<View style={styles.overlay}>
<View style={styles.row}>
<Text style={styles.mainText}>
Current weather for </Text>
<View style={styles.zipContainer}>
<TextInput
style={[styles.zipCode, styles.mainText]} returnKeyType='go' onSubmitEditing={this._handleTextChange}/>
</View>
</View>
{content}
</View>
</Image>
</View>
); }
});
var baseFontSize = 16;
var styles = StyleSheet.create({ container: {
flex: 1,
alignItems: 'center',
paddingTop: 30
},
backdrop: {
flex: 1,
flexDirection: 'column'
},
overlay: {
paddingTop: 5,
backgroundColor: '#000000',
opacity: 0.5,
flexDirection: 'column',
alignItems: 'center'
},
row: {
flex: 1,
flexDirection: 'row',
flexWrap: 'nowrap',
alignItems: 'flex-start',
padding: 30
},
zipContainer: {
flex: 1,
borderBottomColor: '#DDDDDD',
borderBottomWidth: 1,
marginLeft: 5,
marginTop: 3
}, zipCode: {
width: 50,
height: baseFontSize,
},
bigText: {
flex: 2,
fontSize: baseFontSize + 4,
textAlign: 'center',
margin: 10,
color: '#FFFFFF'
},
mainText: {
flex: 1,
fontSize: baseFontSize,
textAlign: 'center',
color: '#FFFFFF'
},
placeHolder: {
flex: 1 }
});
AppRegistry.registerComponent('WeatherProject', () => WeatherProject);
到現在為止,這段代碼就寫完了,試著在您的模擬器或者是實際設備上面運行一下吧。 看起來如何?還有哪些您想做點改變以的?
您也可以在Github 代碼庫中查看全部的應用。
總結
對我們第一個真正的應用,我們其實已經了解了很多實用知識。 我們介紹了一個新的界面組件,<TextInput>, 也學習了如何使用該組件從用戶那里取到信息。 同時也介紹了如何在 React native 里完成基本的樣式, 也包括如何在我們的應用程序里面使用和管理應用所包括的資源文件。 最后,我們了解了如何使用 React Native 的網絡 API 從外部的網站資源里取到數據。 對于第一個應用來說,掌握這些已經很不錯了!因為所有的這些知識點就用 150 行左右代碼就完全覆蓋了。
希望, 我們的展示示例已經能讓你了解到使用React Native 就可以在家用的移動設備上快速的建立起你所需要的應用。
如果想要擴展你的應用功能,下面所列的事情可以去嘗試下:
使用<Forecast> 自己的文件并獲取相對應的數據。
寫一個Jest 測試用例來測試一下這里使用到的組件。
添加更多的圖片,并且根據天氣預報的信息進行轉換。
添加郵政編碼輸入的校驗。
在輸入郵政編碼的時候,切換到最合適的鍵盤。
顯示五天的天氣預報。
一旦我們掌握了更多的議題,諸如地理信息, 我們可以將該應用擴展到更多的用途之上了。
當然,做到這一步也是要付出點努力的。 在下一章節里,我們將介紹一個更好的例子讓您更深刻的了解 React native的使用, 同時也會讓你了解更多有意思的功能! (16939)
不深思則不能造于道。不深思而得者,其得易失。
名人名言- 曾國藩
- By 優聯實達
- 2015-12-15
- 1717
- 公司新聞,網站開發,網站設計,UI